What You Need for Automotive Gear for Beginner DIY Guides Your Wallet Will Thank You For (Winter, December)
Before You Start / What to Know Up Front
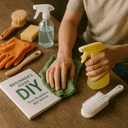
Welcome to the world of automotive DIY! If you're reading this, chances are you're a beginner looking to get your hands dirty and save some cash while keeping your car in tip-top shape. I remember my first winter as a DIYer; I was determined to tackle some basic maintenance myself. It was a bit daunting at first, especially when it came to understanding which tools I really needed versus what just looked cool in the store. I ended up buying a shiny tool I didn’t even use!
This guide is designed for anyone who wants to dive into automotive work without breaking the bank or feeling overwhelmed. We’ll cover essential gear, practical techniques, and some handy tips that will set you up for success. The goal here is to empower you to confidently handle basic car maintenance tasks. Just remember, start small and take your time—there’s no rush in learning! It’s better to take an extra minute to double-check your work than to rush and make a costly mistake.
Method Overview
Our approach here focuses on the fundamentals of automotive DIY. We’ll discuss the essential tools and gear you’ll need to tackle common winter car maintenance tasks. From changing your oil to checking your tire pressure, we’ll break down each step clearly. This method works well for beginners because it simplifies the process. You’ll build confidence as you learn by doing, and you’ll see the results of your work right away.
However, this approach isn't a one-size-fits-all solution. If you're dealing with complex issues like engine repairs or electrical problems, you might want to consider seeking professional help. Those tasks can require specialized knowledge and tools that are beyond what most beginners will have. Always assess your comfort level and the complexity of the task at hand; if you feel uncertain, it’s perfectly fine to ask for guidance.
Deep Step Detail
Let's dive into the steps you’ll need to take for some basic winter automotive maintenance. Here, I’ll outline a few key tasks and the tools you’ll need. Remember to check your vehicle's manual for specific details related to your car.
1. Changing Your Oil
Tools Needed: Oil filter wrench, socket set, oil catch pan, funnel, new oil, new oil filter.
- Step 1: Start by warming up your engine for a few minutes. This helps the oil flow out smoothly. Just don’t let it get too hot; you want it warm, not scalding!
- Step 2: Turn off the engine and locate the oil drain plug under the car. Make sure you have your oil catch pan positioned correctly underneath it to avoid a mess. I once forgot this step and ended up with oil on my driveway!
- Step 3: Use your socket set to remove the drain plug and let the old oil drain completely. This can take a few minutes, so be patient.
- Step 4: Replace the drain plug and tighten it securely. Then, use the oil filter wrench to remove the old oil filter. Apply a little oil to the rubber gasket of the new filter before installing it—this helps create a better seal and makes removal easier next time.
- Step 5: Pour new oil into the engine using the funnel, checking the dipstick as you go to ensure you don’t overfill. I’ve seen many DIYers forget to check the level while pouring; it can lead to engine damage if you overdo it.
2. Checking Tire Pressure
Tools Needed: Tire pressure gauge, air compressor (if needed).
- Step 1: First, make sure your tires are cold for an accurate reading. This means checking them before you drive or after the car has been parked for a few hours.
- Step 2: Remove the valve cap from the tire and press your tire pressure gauge onto the valve stem. It should fit snugly—if you hear hissing, reposition it until you get a good seal.
- Step 3: Read the gauge. If the pressure is below the recommended level (usually found on a sticker inside the driver’s door), add air using an air compressor. I’ve had to stop at gas stations before to use their air pump when I didn’t have one at home.
- Step 4: Repeat for all four tires and don’t forget to replace the valve caps afterward. A missing cap can lead to dirt and debris getting into the valve stem, causing slow leaks.
3. Replacing Windshield Wipers
Tools Needed: New wiper blades (make sure they fit your car), a flat-head screwdriver.
- Step 1: Lift the wiper arm away from the windshield. Be careful; they can snap back and damage the glass if you’re not cautious.
- Step 2: Look for the release tab on the wiper blade and press it to remove the old blade. If it’s stuck, a gentle twist with the screwdriver can help.
- Step 3: Slide the new wiper blade into place until you hear it click. It’s always a good idea to check that it’s secure before you lower the arm back down.
- Step 4: Lower the wiper arm back onto the windshield. I recommend testing the new blades with some windshield fluid before hitting the road to ensure they work properly.
These tasks are not only essential for winter readiness but also relatively simple for beginners. The first time I changed my oil, I was pleasantly surprised at how straightforward it was. Just make sure to dispose of the old oil properly; many auto parts stores offer recycling programs, and some even provide a small discount for returning your used oil.
Troubleshooting & Fix-ups
No matter how prepared you are, things don’t always go to plan. Here are a few common issues DIYers run into and how to handle them.
- Oil Leaks: If you notice oil pooling under your car after an oil change, double-check that the drain plug and oil filter are tightened properly. If they are and it’s still leaking, you might need to replace the gasket or seek professional help.
- Incorrect Tire Pressure Readings: If your gauge shows a reading that seems off, try recalibrating it or using a different gauge. Sometimes, gauges can malfunction, especially the cheaper ones. I’ve had my fair share of frustratingly inaccurate readings!
- Wiper Blades Not Working Properly: If your new wiper blades are streaking or skipping, make sure they’re installed correctly and that the wiper arm isn’t bent. Sometimes, just re-positioning them can solve the issue. If they’re still not performing, it might be worth trying a different brand.
Common Mistakes & How to Avoid Them
As I’ve learned from experience, beginners often make a few common mistakes. Let’s go over some of them so you can avoid the same pitfalls.
- Not Using the Right Tools: Many people think they can get by with whatever's lying around. Having the right tools makes a world of difference. Invest in a basic automotive toolset, including socket wrenches and a reliable jack, and keep it organized.
- Overfilling Oil: This is a surprisingly common mistake. Always check your dipstick frequently while filling to avoid overfilling, which can lead to engine damage. I’ve seen this happen, and it’s not pretty!
- Ignoring Safety Precautions: I can’t stress this enough; always wear gloves and eye protection when working on your car. You never know when something might splash or fall. I learned the hard way after a little oil got in my eye once—definitely not fun!
- Rushing the Job: It’s tempting to hurry through tasks, especially when you’re excited. Take your time, double-check each step, and don’t hesitate to look things up if you’re unsure. It’s better to take an extra few minutes than to fix a mistake later.
- Forgetting to Check Your Manual: Your car's manual is a treasure trove of information. It contains specific details about your vehicle's recommended maintenance schedule and specifications that are crucial for your DIY work. I’ve often found valuable tips in mine that saved me time and effort.
Pro Tips & Lessons Learned
Over the years, I’ve picked up a few tricks that have saved me time, money, and frustration. Here are some of my favorites:
- Keep a Maintenance Log: Recording when you perform maintenance tasks can help you stay on top of things and remind you when it's time for the next service. I use a simple notebook, but there are great apps out there too.
- Use a Magnet for Small Parts: If you’re working on something with multiple screws or nuts, use a magnet to keep them organized. It’s easy to lose small parts, and this will save you a lot of headaches. I once spent half an hour looking for a bolt that rolled under the car!
- Take Photos During Disassembly: If you’re taking something apart, snap a few pictures as you go. It makes reassembly much easier when you can refer back to exactly how things were put together.
- Buy Quality Products: In the long run, investing in quality tools and parts can save you money. Cheap tools often break or wear out quickly, leading to more costs down the line. I’ve regretted cutting corners on tools before!
- Ask for Help: Don’t be afraid to reach out to friends or family who might have experience. A second pair of hands can make a big difference and sometimes they have tips you wouldn’t even think of.
Budget & Time Signals
The cost and time it takes to perform these maintenance tasks can vary widely. Here’s a general idea of what you might expect:
- Changing Oil: Expect to spend around $30-$60 for oil and a filter, and allocate about an hour for the job. If you buy in bulk, you might save a few bucks!
- Checking Tire Pressure: This task is practically free if you already have a gauge, and it should only take about 10 minutes. Don’t forget to check your spare tire, too!
- Replacing Wiper Blades: New blades usually cost between $15-$30, and it’s a quick job that can be done in under 15 minutes. I often pick mine up during sales at auto parts stores.
Keep in mind that prices can vary based on where you live and the specific brands you choose. If you can, shop around for sales or consider purchasing items in bulk to save money.
When to Call a Pro
While it’s great to tackle DIY automotive tasks, there are times when it’s best to call in a professional. Here are some clear indicators that you should consider getting help:
- Complex Repairs: If you’re dealing with engine issues, electrical problems, or anything that requires specialized knowledge, it’s time to call a pro. These repairs often require diagnostic tools and experience. I’ve learned to call for help after getting in over my head on a few occasions!
- Safety Concerns: If you’re not 100% sure about what you’re doing, especially with brakes or suspension, it’s better to err on the side of caution. Your safety is paramount. Don’t hesitate to get a second opinion.
- Time Constraints: If you don’t have the time to commit to a project, it might be worth paying someone else to do it. Sometimes, the peace of mind is worth the cost. I’ve definitely had times when I needed my car fixed quickly!
- Lack of Tools: If a task requires tools you don’t have and won’t use again, it might be more economical to have a professional handle it.
Conclusion
Congratulations on taking your first steps into the world of automotive DIY! You’re now equipped with the knowledge of essential gear, practical steps to maintain your vehicle, and tips to set yourself up for success. Remember, every expert was once a beginner, and the more you practice, the better you’ll get.
So today, why not start with a simple task, like checking your tire pressure or changing your wipers? It’s a small step, but it can make a big difference in keeping your car safe and functional this winter. Remember, every time you turn a wrench or check a tire, you’re one step closer to becoming a confident DIYer. Happy wrenching!