Ultimate Tool Kits for Smart Home & AI DIY for Small Spaces (Winter, December, Christmas)

)
Tools Needed
Materials Needed
Safety Tips
- Always turn off power at the circuit breaker before installing electrical devices.
- Protect your network credentials and use strong, unique passwords.
- Follow manufacturer instructions carefully to avoid electrical hazards.
- Use a ladder safely when installing devices in high or hard-to-reach places.
Ultimate Tool Kits for Smart Home & AI DIY for Small Spaces (Winter, December, Christmas)
As the holiday season rolls around, many of us find ourselves in the spirit of giving—and what better gift than a smarter, more efficient home? If you live in a small space, integrating smart home devices can make a world of difference, especially during the winter months when you want to maximize comfort while minimizing energy costs. I remember the first time I tried my hand at setting up smart devices in my tiny apartment; I was overwhelmed by all the options. However, with a little guidance and the right tools, I found it not only manageable but also surprisingly rewarding. This article is here to help you navigate the world of smart home integration, especially if you’re working in a cozy space.
Before You Start / What to Know Up Front
Before diving into the nitty-gritty of setting up your smart home devices, there are a few key considerations. First, understand that smart home technology is all about improving your lifestyle. It’s not just about convenience; it can also enhance security and save on energy costs. However, before you start, take a moment to think about your existing layout and how these devices can fit into your daily routine.
You’ll want to ask yourself: What do I want to achieve? Is it better lighting, improved security, or perhaps more efficient heating? Knowing your goals will guide your decisions and help you choose the right tools and devices for your needs. Also, ensure that you protect your network credentials and follow device pairing security best practices. This is crucial to keeping your smart home safe from prying eyes. I’ve seen too many DIYers overlook this, leading to unnecessary headaches later on.
Method Overview
In this article, we'll take a hands-on approach to integrating smart devices into small spaces using a straightforward method. We’ll explore how to set up smart lights, thermostats, and security cameras while keeping everything organized and efficient. This method works well because it allows you to prioritize tasks based on the layout of your home and your specific needs, ensuring you don’t overwhelm yourself with too much at once.
However, it’s important to note that if you’re dealing with outdated wiring or a home that hasn’t been updated in years, you might run into compatibility issues. In such cases, it might be best to consult a professional before you begin. I once tried to install a smart device in an old apartment and quickly realized that the wiring was a major hurdle.
Deep Step Detail
Now, let’s get into the specifics. Here’s a step-by-step guide to setting up your smart home tools in a small space:
- Assess Your Space: Start by evaluating the areas where you want to add smart devices. Measure the dimensions of your rooms and consider the layout. For instance, if you’re installing smart lights, think about where you spend most of your time. In my living room, I installed smart bulbs above my coffee table and near my reading nook to create a cozy atmosphere.
- Choose Your Devices: Based on your assessment, select devices that meet your needs. For example, if you want to control your lighting remotely, consider smart bulbs like Philips Hue or LIFX. If energy savings are your priority, a smart thermostat like the Nest Learning Thermostat can be a game-changer. I’ve personally found that having the ability to schedule heating around my activities has saved me quite a bit on my energy bills.
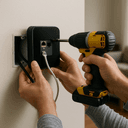
- Gather Your Tools: You’ll need some basic tools to get started. A screwdriver set, a drill, and a measuring tape are essential. If you’re installing smart security cameras, you might also need a ladder for hard-to-reach places. I recommend having a power drill on hand as it can make installations much quicker.
- Install Your Devices: Follow the manufacturer’s instructions for each device. For example, when installing a smart thermostat, it’s crucial to turn off the power at the circuit breaker to avoid electrical shock. I made this mistake once, and it was a wake-up call to always prioritize safety. It’s better to be safe than sorry, so double-check that power is off before you start working.
- Connect to Your Network: Once your devices are installed, the next step is to connect them to your Wi-Fi network. Use the companion app for each device to complete this process. This is where keeping your network credentials safe comes into play. Avoid using easily guessed passwords; I’ve found that using a password manager helps in keeping track of everything securely.
- Configure Settings: After connecting, you’ll want to customize the settings to suit your lifestyle. For example, set schedules for lights to turn on and off at specific times or adjust temperature settings for when you’re home versus away. This is where you can really make your home work for you. I enjoy programming my lights to mimic a sunrise in the morning, making waking up a bit easier.
Troubleshooting & Fix-ups
Once you’ve set everything up, it’s time to sit back and enjoy your new smart home. However, things don’t always go smoothly. One common issue is connectivity problems. If your devices aren’t responding, check your Wi-Fi signal strength. If it’s weak, consider moving your router closer or using a Wi-Fi extender. I learned this the hard way when my smart bulbs wouldn’t respond, and it turned out my router was too far away.
Another issue is device compatibility. Sometimes, devices from different manufacturers won’t play nice together. If you find that your smart thermostat doesn’t communicate with your smart lights, check if they are compatible with the same smart home ecosystem. If not, you might need to invest in a hub that can manage different brands. I’ve had to do this myself, and it’s worth checking compatibility before purchasing.
Common Mistakes & How to Avoid Them
Throughout my DIY journey, I’ve seen many people make the same mistakes. Here are some common pitfalls and how to sidestep them:
- Ignoring Compatibility: Always check whether devices work with your existing setup. I once paired a smart lock with a hub that didn’t support it, leading to a frustrating day of returns. Take the time to research compatibility before you buy.
- Overloading Circuits: When installing multiple devices, be mindful of the electrical load on your circuits. You don’t want to trip a breaker during a holiday gathering. Always consult your home’s electrical specifications if you’re unsure, especially in older homes.
- Neglecting to Update Firmware: Many devices require updates to function optimally. Set a reminder to check for firmware updates regularly. I’ve found that failing to do this can lead to laggy performance, which is frustrating.
- Misplacing Instructions: Keep all manuals in a designated folder or digital format. I can’t tell you how many times I’ve had to scramble to find an installation guide. Having everything in one spot can save you time and stress.
- Skipping Safety Protocols: Always turn off power when working with electrical devices. Trust me, the last thing you want is a shock that could have been easily avoided. It’s a simple step that can save you a lot of trouble.
Pro Tips & Lessons Learned
As I’ve navigated the world of smart home DIY, I’ve picked up a few tricks that can save you time and frustration:
- Start Small: Don’t try to automate your whole home at once. Pick one or two devices and get comfortable with them before expanding. It’s far less overwhelming this way.
- Document Your Setup: Keep a log of how you’ve set up each device, including passwords and settings. This will save you a headache later when troubleshooting. I use a simple spreadsheet for this, and it’s incredibly helpful.
- Use Voice Control: If your devices are compatible, consider adding a voice assistant like Amazon Alexa or Google Assistant. This can make controlling your home easier and more intuitive. I’ve found that being able to adjust the thermostat with a simple voice command is a game-changer.
- Consider Energy Monitoring: Some smart plugs offer energy monitoring features. This can help you identify which devices are using the most power, allowing you to make informed decisions about your energy consumption. I’ve used this feature to cut down on energy waste.
- Involve Family Members: If you live with others, involve them in the setup process. This way, everyone knows how to use the devices, reducing confusion. I’ve had great success getting my family on board by showing them the benefits firsthand.
Budget & Time Signals
When planning your smart home project, it’s essential to consider your budget and time. On average, you can expect to spend anywhere from $200 to $1,000, depending on the number and type of devices you want to install. Smart bulbs are relatively inexpensive, while smart thermostats and security systems can drive costs up significantly. Be sure to shop around and look for sales, especially around the holidays.
Time-wise, setting up your devices can take anywhere from a few hours to a couple of days, especially if you’re integrating multiple devices. If you want to phase your project, consider starting with lighting and a thermostat before adding security features. This way, you won’t feel overwhelmed and can enjoy the process.
When to Call a Pro
While DIYing is rewarding, there are times when it’s best to call in the professionals. If you come across any of the following situations, don’t hesitate to reach out:
- Complex Wiring: If you’re dealing with complex wiring or older electrical systems, it’s safer to consult an electrician. I’ve always felt that when in doubt, it’s better to be safe.
- Incompatibility Issues: If you find that your devices aren’t compatible and you’re unsure how to proceed, a professional can help you navigate these challenges. It can save you time and frustration.
- Security Concerns: If you’re installing a security system and feel uncomfortable doing it yourself, it’s worth hiring a pro to ensure everything is set up correctly. You don’t want to compromise your home’s safety over a DIY project.
Conclusion
Integrating smart home technology into your small space doesn’t have to be daunting. With the right tools, a clear plan, and a bit of patience, you can create a cozy, efficient environment that enhances your quality of life—especially during the winter months. Remember to take it step by step, keep safety at the forefront, and don’t hesitate to reach out if you need help.
So, what’s the next step you can take today? Maybe start by choosing one smart device that excites you and do a little research on how it can fit into your life. You’ve got this!
Recommended Gear
Disclosure: As an Amazon Associate, we may earn from qualifying purchases at no extra cost to you.
Common Mistakes
- Ignoring device compatibility leading to integration issues.
- Overloading electrical circuits by installing too many devices at once.
- Neglecting to update device firmware causing performance problems.
- Misplacing installation manuals and instructions.
- Skipping safety protocols such as turning off power before installation.
More in Smart Home