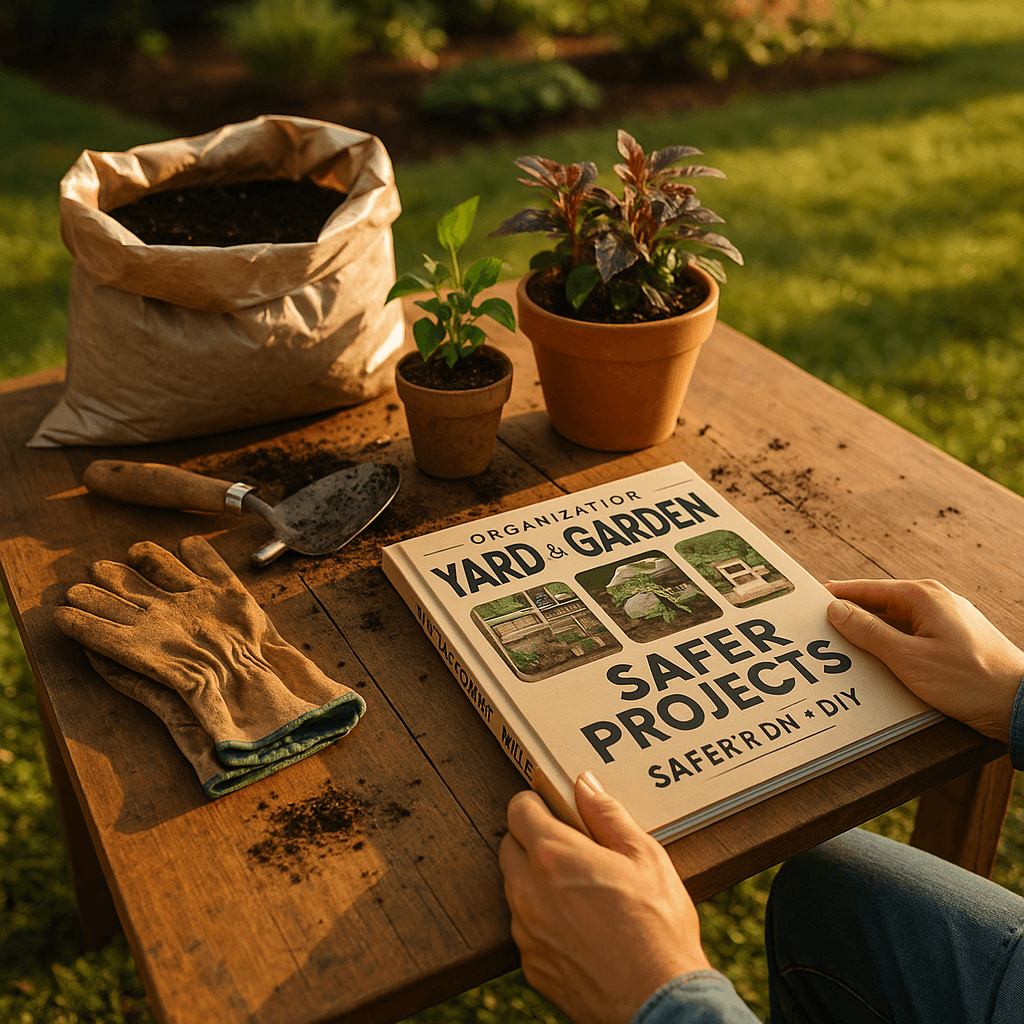
How to Organization Must-Haves for Yard, Garden, & Outdoor DIY for Safer Projects (Winter, December)
Tools Needed
Materials Needed
Safety Tips
- Store chemicals and fertilizers in locked cabinets or out of reach of children and pets.
- Always unplug power tools before storing them.
- Wear gloves and goggles when handling tools or chemicals to prevent injuries.
- Inspect tools regularly for damage or rust to avoid accidents.
- Adjust organization plans based on your local winter weather conditions.
Before You Start / What to Know Up Front
Alright, friends! If you’re anything like me, winter can often feel like a time to retreat indoors, but there’s a lot you can still do outside—especially when it comes to getting your yard and garden organized. I remember the first winter I decided to tackle my outdoor space; I felt overwhelmed by the sheer amount of stuff I had lying around. My tools were scattered, my pots were in disarray, and honestly, I was losing track of what I even owned. So, I took a deep breath and started organizing everything.
This guide is for DIYers like you who want to manage landscape and exterior projects during the colder months. We’ll cover how to set up a safer workspace, organize your must-haves, and ensure that you’re ready for the spring planting season. You can expect to learn about the tools you need, how to store them, and some nifty tricks that will save you time and money.
Method Overview
The approach we’re taking here is all about creating a functional outdoor workspace that maximizes safety and efficiency. We’ll focus on organizing your tools, supplies, and materials. The best part? This method works whether you have a huge garden shed or just a small corner by the patio. By the end of this project, you’ll be able to find everything you need without digging through piles of equipment, and you’ll be ready for any projects that come your way, even in winter.
However, if you live in an area with extreme winter conditions—like heavy snowfall or ice—you might want to prioritize indoor organization instead. Make sure to adjust your plans based on your climate.
Deep Step Detail
Here’s a detailed step-by-step guide to get your outdoor space organized:
Step 1: Gather Your Materials
Start by collecting all your tools and supplies from around your yard and garden. You might find things in the shed, garage, or even tucked away in the house. Make a list of everything you find:
- Hand tools (shovels, rakes, pruners)
- Power tools (chainsaw, leaf blower)
- Pots and containers
- Fertilizers and chemicals
- Seeds and plant food
- Safety gear (gloves, goggles)
Step 2: Clean and Inspect
Once you have everything gathered, it’s time to clean. Use a damp cloth to wipe down tools and remove any dirt or grime. This is also a good time to inspect for damage. Check for rust on metal tools or cracks in plastic containers. If something is broken, decide if it’s worth fixing or if it’s time to replace it. I once found a cracked pot that I thought could be repaired, but it was better to upgrade to a new one for my plants' sake.
Step 3: Sort and Categorize
Now that everything is clean, sort your items into categories. I like to group them by type and frequency of use. For example:
- Daily Use: Hand tools you use frequently
- Seasonal: Items like snow shovels or holiday decorations
- Rarely Used: Specialty tools or supplies for specific projects
Most DIYers I see forget to consider how often they use certain items, which can lead to frustration later on.
Step 4: Create a Storage Plan
With your items sorted, it’s time to figure out where everything will go. I recommend investing in some durable plastic bins or a pegboard system for your tools. Here’s how to set it up:
- Shelving Units: Use sturdy shelves for bulkier items like bags of soil or larger tools.
- Bins: Store smaller items in clear bins so you can see what’s inside.
- Pegboard: Hang frequently used tools on a pegboard for easy access.
I remember installing a pegboard in my garage, and it made a world of difference in how quickly I could grab my tools.
Step 5: Label Everything
Once you’ve got your storage in place, don’t skip the labeling! Use a label maker or some good old-fashioned masking tape and a marker. Labeling helps not only you but anyone else who might use your space. You’d be surprised how much time you can save by just knowing where things belong. I’ve saved countless minutes searching for my gardening gloves since I started labeling my bins.
Step 6: Safety First
Before you finish, make sure to put safety at the forefront. Store chemicals and fertilizers in a locked cabinet or high shelf, out of reach of children and pets. Also, make sure all your power tools are unplugged and stored safely. Remember, a safe workspace is a happy workspace. Don’t forget to check your safety gear—having a proper pair of gloves or goggles on hand can prevent accidents and injuries.
Troubleshooting & Fix-ups
Even after following these steps, you might run into some bumps along the way. Here are some common problems and how to handle them:
- Rusty Tools: If you discover rust on your tools, don't panic! Use a wire brush or sandpaper to scrub off the rust. Then, apply some oil to protect them from future rusting.
- Too Many Items: If you feel like you have too much stuff, consider having a garage sale or donating items you no longer use. I once cleared out half my shed and felt a huge weight lift off my shoulders.
- Space Constraints: If you run out of space, think vertically! Add shelves or hooks to walls. I’ve used wall-mounted hooks for my garden hoses, and it saves so much floor space.
- Chemical Storage Issues: If you can’t find a safe place for chemicals, check local regulations for guidelines on outdoor chemical storage. It’s essential to stay informed about safe practices.
- Tool Damage: If you find broken tools, decide if they can be repaired. Sometimes, a quick fix with some duct tape or a new part can save a tool you love.
Common Mistakes & How to Avoid Them
From my years of DIYing, I’ve seen plenty of mistakes when it comes to organizing outdoor spaces. Here are a few to watch out for:
- Ignoring Weather Conditions: Don’t forget that winter weather can affect your tools. If you leave them outside, they can get damaged. Always bring them inside or store them properly.
- Not Securing Chemicals: One of the biggest oversights is not securing hazardous materials. Always keep chemicals locked up and follow the manufacturer’s instructions for storage. I once had a scare when I forgot to lock up some fertilizers, and it made me rethink my storage practices.
- Overstuffing Bins: It’s tempting to cram as much as you can into storage bins, but overstuffing can lead to damage. Stick to a manageable amount in each bin.
- Skipping Safety Gear: Don’t forget about safety gear! Make sure you have gloves and goggles on hand when you’re working with tools or chemicals. I know it can be a hassle, but trust me, wearing the right gear is worth it.
- Not Labeling: I can’t stress this enough—label everything! It’s so easy to forget where things belong, and labeling saves you time in the long run.
Pro Tips & Lessons Learned
Here are some of my favorite pro tips that can make your organizing project smoother:
- Use Clear Containers: I love using clear storage bins because it’s much easier to see what’s inside. You can save time and frustration searching through opaque bins.
- Think About Accessibility: Store the items you use most often at eye level. This will save you from bending down or climbing to get what you need. I keep my hand tools at eye level, and it saves a ton of hassle.
- Use a Garden Cart: If you have a lot of heavy items, consider getting a garden cart. It can save your back and make transporting things much easier.
- Regular Maintenance: Set a reminder to check your outdoor organization at the beginning of every season. This will help keep everything in order. I usually do mine with the changing of the seasons, and it keeps clutter at bay.
- Get the Family Involved: If you have kids, get them involved in the organizing process. It can be a fun family project and teach them about responsibility and safety.
Budget & Time Signals
When you’re planning your organization project, it’s good to have a budget in mind. Here’s a realistic overview of what you might expect:
- Storage Bins: $10-$30 each, depending on size and material.
- Shelving Units: $50-$200, depending on quality and size.
- Pegboard System: $20-$50 for a basic setup.
- Label Maker: $15-$50.
- Time Investment: Expect to spend a weekend or two, depending on how much you have to organize.
Prices can vary based on where you shop and the materials you choose. If you’re on a tight budget, consider repurposing items you already have or checking out local thrift stores for bins and shelving.
When to Call a Pro
Sometimes, despite our best efforts, we just can’t tackle a project on our own. Here are some warning signs that it might be time to call in a pro:
- Severe Damage: If you have broken tools that require specialized repair, like a power tool with electrical issues, it’s safer to let a professional handle it.
- Chemical Concerns: If you’re unsure about how to store or dispose of hazardous materials, consult a local expert or hazardous waste facility. It’s better to be safe than sorry.
- Lack of Time: If you’re busy and just don’t have the time to organize, hiring a pro can save you a lot of stress and get the job done quickly.
Conclusion
Organizing your outdoor space during winter doesn’t have to be a daunting task. With the right approach, tools, and a bit of creativity, you can transform your yard and garden into a functional and safe workspace. Remember, the key is to take it one step at a time, and before you know it, you’ll have everything organized and ready for the next warm season.
So, grab your gloves, gather your materials, and let’s get started on this rewarding project. The next time you step outside, you’ll feel a sense of pride in your organized space. Happy DIYing!
Recommended Gear
Disclosure: As an Amazon Associate, we may earn from qualifying purchases at no extra cost to you.
Common Mistakes
- Ignoring weather conditions and leaving tools exposed to winter elements.
- Not securing hazardous chemicals properly.
- Overstuffing storage bins causing damage to items.
- Skipping the use of safety gear during projects.
- Failing to label storage containers leading to wasted time searching for items.
)