Expert Tips for Organization Must-Haves for Tools & Gear for Long-Term Value (Winter, November)
Materials Needed
Safety Tips
- Inspect tools for wear and damage before use to prevent accidents.
- Discard any tools with dull blades or loose handles.
- Keep your workspace tidy to avoid tripping hazards.
- Use appropriate cleaning tools and chemicals safely.
Before You Start / What to Know Up Front
As we dive into the world of tool organization, let me first share a little story from my own DIY journey. I remember the first time I took on a project to organize my garage. I had tools scattered all over the place—screwdrivers hidden under old paint cans, and my beloved power drill was buried somewhere in the depths of a cluttered shelf. It was frustrating, and I knew I had to find a solution. Fast forward a few weekends later, and I had transformed my chaotic garage into a well-ordered space where I could easily find everything.
This guide is for DIYers like you who want to take their tool organization to the next level. Whether you're a weekend warrior or a seasoned pro, having a tidy and efficient workspace can save you time and headaches in the long run. However, before we get into the nitty-gritty, let’s set some expectations: organizing tools isn’t just about aesthetics; it’s about functionality too. You want to set up a system that makes your projects smoother and more enjoyable while also being safe.
Method Overview
The method I advocate for is a systematic approach to organizing your tools and gear. It’s all about categorizing and storing your tools in a manner that allows for easy access and visibility. This means grouping similar items together, labeling storage spaces, and ensuring everything has a designated spot. Why does this work? Because it minimizes the time you spend searching for tools and maximizes your efficiency when you’re deep into a project.
However, this method isn’t a one-size-fits-all solution. If you have a very small workspace, you might need to adapt this approach to fit your specific needs. Some folks also prefer mobile tool storage, like rolling cabinets or portable toolboxes, for flexibility. So, keep in mind that this method is about finding what works best for you while adhering to the core principles of organization.
Deep Step Detail
Now, let’s break down the steps to organize your tools effectively. I’ll guide you through each phase, complete with specific examples and settings you can use. This is where the real fun begins!
Step 1: Gather Your Tools
Before you can organize, you need to have everything in one place. Take a weekend and pull out all your tools from drawers, cabinets, and any hidden corners of your garage or workshop. Lay them out on a flat surface like a workbench or even your driveway. This step is crucial because it gives you a clear view of what you have. It’s also a great opportunity to clean your tools and inspect them for any damage.
Step 2: Clean and Inspect
Once everything is out, give each item a good cleaning. I like to use a wire brush for rusted tools and some degreaser for those grimy surfaces. You’d be surprised how much easier it is to work with clean tools. While cleaning, inspect them for wear and tear. A dull blade or a loose handle can lead to accidents. Toss out anything that’s beyond repair. This might feel tough, but trust me, it’s better to have fewer, functional tools than a bunch of broken ones cluttering your space.
Step 3: Categorize Your Tools
After cleaning, it’s time to categorize. Group your tools into categories such as:
- Hand Tools (screwdrivers, pliers, wrenches)
- Power Tools (drills, saws, sanders)
- Gardening Tools (shovels, rakes, pruners)
- Fasteners and Hardware (nails, screws, bolts)
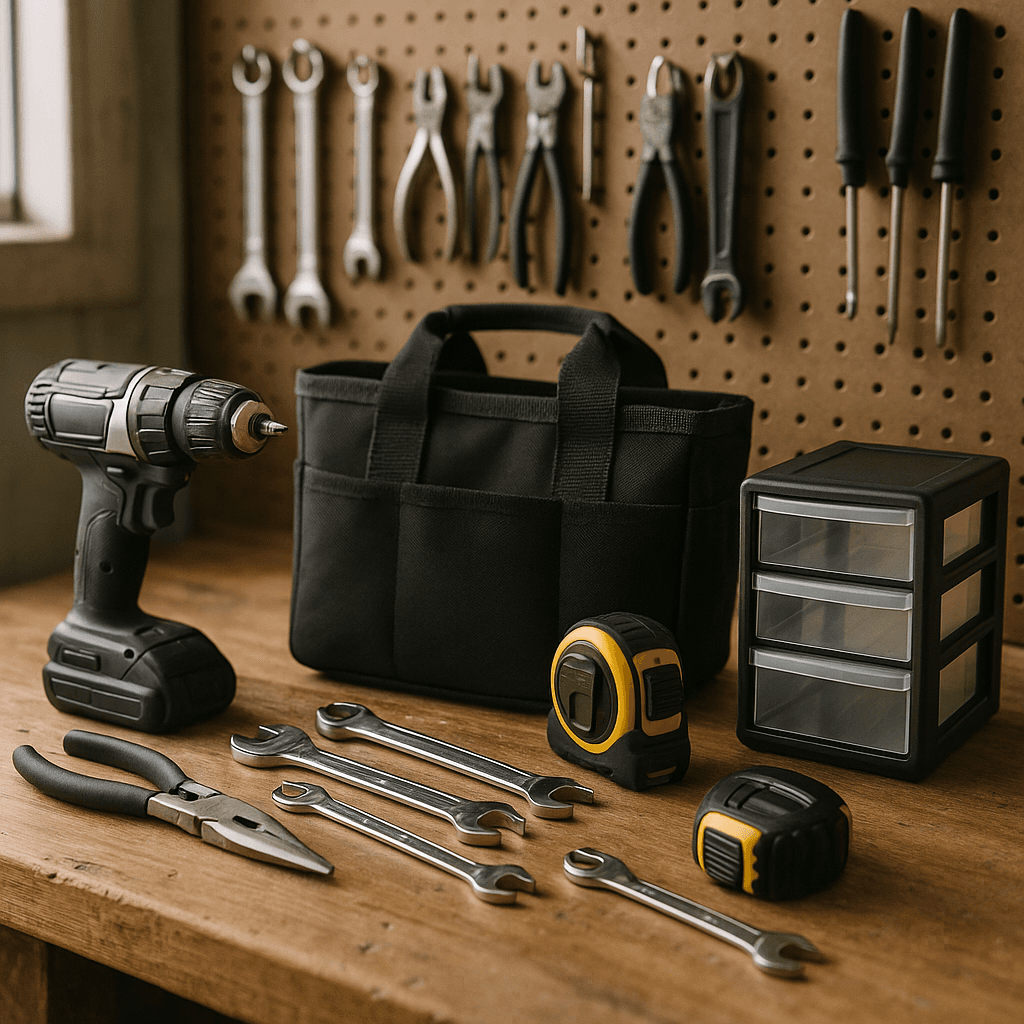
This organization will help you find tools quickly when you need them. I recommend using clear bins or labeled boxes for small items like screws and nails. You can even use a pegboard for hand tools, which not only keeps them organized but also makes them easily accessible. One trick I learned is to color-code your bins; it adds a bit of fun and makes it even easier to identify what you need at a glance.
Step 4: Choose Your Storage Solutions
Now that your tools are categorized, it’s time to think about storage. Consider your workspace’s layout and your workflow. Some great options include:
- Tool Chest: A sturdy tool chest is perfect for keeping hand tools organized. Look for one with drawers that can hold various tools and compartments for smaller items.
- Shelving Units: For larger power tools, heavy-duty shelving is ideal. This keeps everything visible and easy to reach.
- Pegboard: As I mentioned earlier, pegboards are fantastic for frequently used hand tools. You can customize the layout based on your preferences.
- Mobile Workbench: If you need flexibility, a mobile workbench with built-in storage can be a game-changer. You can roll it to wherever you need it most.
- Wall-Mounted Racks: Great for larger items like ladders and garden tools, wall-mounted racks can help free up floor space.
Step 5: Label Everything
Labeling is a step many DIYers overlook, but it’s essential for maintaining organization. Use a label maker or simple masking tape and a permanent marker to label each bin, box, or shelf. This will not only help you find things quickly but also encourage everyone in your household to return tools to their rightful place after use. I learned this the hard way when my family would borrow my tools and leave them scattered everywhere! If you have children or other family members helping out, consider using images on the labels for a visual cue.
Step 6: Establish a Maintenance Routine
After you’ve successfully organized your tools, it’s important to create a routine for maintenance. Set aside a few minutes after each project to put everything back in its place. This simple habit will keep your workspace tidy and prevent clutter from building up again. Plus, it makes the next project much easier since you’ll know exactly where everything is. I often set a timer for 10 minutes after a project; it’s amazing how much you can accomplish in that short time.
Troubleshooting & Fix-ups
Even with the best plans, things can go awry. Here are some common issues you might face and how to deal with them.
Problem: Tools Still Get Lost
If you find that tools frequently go missing, consider implementing a check-out system. Keep a notepad or a digital app handy for tracking which tools are borrowed and by whom. This might seem a bit formal, but trust me, it works wonders in households with multiple DIYers.
Problem: Items Don’t Fit in Storage
Sometimes, the storage solutions you choose may not fit everything perfectly. If you find that your tool chest is overflowing, don’t hesitate to reassess your categories. Perhaps some items can be relocated to another space or given their own dedicated storage solution. If you’re noticing a lot of overlap, a quick inventory can help clarify what you really need versus what you can let go of.
Problem: Overwhelmed by Too Many Tools
If you’re feeling overwhelmed by the amount of gear you have, it might be time to declutter. Ask yourself if you’ve used a tool in the past year. If not, consider donating or selling it. This not only frees up space but can also provide someone else with a much-needed tool. I once had a table saw that just sat unused for over two years; letting it go was liberating and made room for new gear.
Common Mistakes & How to Avoid Them
From my years of DIY experience, I’ve seen some common mistakes that can derail your organization efforts. Here’s how to avoid them:
- Not Planning Your Layout: Jumping in without a plan can lead to a chaotic setup. Take the time to sketch out your ideal layout before moving anything around. Use graph paper or an app to visualize your space.
- Ignoring Vertical Space: Many DIYers forget to utilize vertical space. Shelving units and hanging tools can make a huge difference in keeping your floor clear. Consider wall-mounted organizers or pegboards to maximize your space.
- Overcomplicating the System: Sometimes, people create overly complicated storage systems that no one can remember. Keep it simple and intuitive. If you need to explain your setup to someone else, it might be too complex.
- Neglecting to Label: As I mentioned earlier, labeling is key. Don’t skip this step, or you’ll find yourself confused later. A little time spent labeling can save you hours in the long run.
- Forgetting About Safety: Ensure that all storage solutions are stable and secure. Heavy items should be stored low to the ground to prevent accidents. Always follow manufacturer instructions when assembling any storage units. I once had a shelf collapse because I overloaded it; a hard lesson learned.
Pro Tips & Lessons Learned
Over the years, I’ve picked up some handy tricks that can save you time, money, and frustration:
- Use Magnetic Strips: Install magnetic strips on your wall to hold metal tools like scissors and screwdrivers. This keeps them visible and easy to grab.
- Repurpose Old Furniture: Don’t toss that old dresser or bookshelf. With a little creativity, they can be transformed into fantastic storage solutions for tools. I turned an old nightstand into a compact tool storage unit that fits perfectly in my workshop.
- Create a Tool Inventory: Keep an inventory of your tools, especially for larger or more expensive items. This can help prevent loss and also assist in future purchases. A simple spreadsheet can work wonders here.
- Invest in Quality Storage: While it’s tempting to go for the cheapest option, investing in quality storage solutions pays off in the long run. They’ll last longer and keep your tools safer. I’ve seen cheap bins crack and break after just a few months, leading to more headaches.
- Regularly Reassess Your Setup: As your collection grows or your projects change, don’t hesitate to reassess your organization system. What worked last year might not work this year. I make it a point to evaluate my system every spring when I do a deep clean.
Budget & Time Signals
When it comes to organizing your tools, the budget can vary widely depending on your needs and choices. Here’s a rough breakdown of what you might expect:
- Low Budget (Under $100): Basic bins, labels, and perhaps a pegboard can be set up for minimal cost. This is ideal for those just starting out or with a small collection.
- Mid-Range Budget ($100 - $500): A quality tool chest or shelving unit can be acquired in this range. You can also invest in some good organizational bins and labels.
- High-End Budget ($500+): For those who have a larger collection and want to invest in high-quality storage solutions, this budget allows for premium tool chests, specialized cabinets, and even custom-built storage solutions.
When planning your time, expect to spend a weekend or two depending on the size of your tool collection. Some tasks can be phased, like cleaning and organizing one category at a time, which can make the process less overwhelming. I often tackle one section at a time to keep from feeling swamped.
When to Call a Pro
While organizing tools can be a fulfilling DIY project, there are times when it’s wise to call in a pro. If you’re dealing with a large workshop or garage that requires extensive renovations or custom-built storage solutions, a professional organizer or carpenter may be beneficial. Additionally, if you find yourself struggling to make decisions about what to keep or toss, a professional can provide valuable guidance and a fresh perspective. I’ve called in pros for large projects, and their expertise has saved me countless hours and headaches.
Conclusion
To wrap it all up, organizing your tools is one of the best investments you can make in your DIY journey. Not only does it save you time, but it also enhances your overall project experience. Remember, the key is to create a system that works for you and your space. So grab some bins, get to cleaning, and start categorizing! You’ll be amazed at how much easier your next project will be when you know exactly where everything is.
Take the first step today by cleaning just one drawer or toolbox. It’s a small win, but it’s the first of many on your path to a well-organized workshop!
Recommended Gear
Disclosure: As an Amazon Associate, we may earn from qualifying purchases at no extra cost to you.
Common Mistakes
- Not planning the layout before organizing tools leading to a chaotic setup.
- Ignoring vertical space and missing opportunities to maximize storage.
- Creating overly complicated storage systems that are hard to maintain or remember.

)