Essential Smart Devices for Smart Home & AI DIY for Safer Projects (Winter, December)

Tools Needed
Materials Needed
Safety Tips
- Turn off power at the breaker before any electrical work.
- Use strong passwords and enable two-factor authentication for network security.
- Regularly test smoke detectors and monitor device performance.
Essential Smart Devices for Smart Home & AI DIY for Safer Projects (Winter, December)
As winter rolls in, it’s the perfect time to upgrade your home with smart devices that enhance convenience and safety. Whether you want to automate your lights, add security cameras, or control your thermostat remotely, integrating smart technology can feel overwhelming. But trust me, it’s not as complex as it sounds!
Quick Answer
To create a safer smart home this winter, start by installing smart smoke detectors, smart lights, and a smart thermostat. These devices boost safety, comfort, and energy efficiency without breaking the bank.
Experience Context
Let me share a little story from my first attempt at setting up a smart home system. I was excited to automate my living room lights and decided to use a smart hub I bought online. Halfway through, I hesitated when I realized I hadn’t checked compatibility with my existing lights. I plugged everything in anyway, and to my surprise, the lights flickered but didn’t connect. I faced a decision: should I downgrade to cheaper bulbs or invest in compatible smart bulbs? I ended up spending more to get the right ones, but it taught me a valuable lesson about planning ahead.
Before You Start
Before diving into your smart home project, keep these essentials in mind:
- Understand Compatibility: Research if your smart devices will work with your existing home network. Not all brands play nice together.
- Network Security: Protect your network credentials. Use strong passwords and enable two-factor authentication to prevent unauthorized access.
- Plan for Power Needs: Some smart devices require a dedicated power source or hardwiring, complicating installation.
Method Overview
We’ll take a step-by-step approach to integrate key smart devices into your home. This method works best if you're comfortable with basic DIY tasks and have a reliable Wi-Fi connection. If you're not tech-savvy or your home has unique wiring issues, it might not be the best fit for you.
Deep Steps
Here’s how to set up your essential smart devices:
- Choose Your Smart Hub
- Select a hub that meets your needs (like SmartThings or Amazon Echo). Ensure it’s compatible with the devices you want to connect. For instance, if you have Philips Hue lights, consider a hub supporting Zigbee for better integration.
- Install Smart Lights
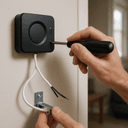
- Replace existing bulbs with smart bulbs, or install smart switches if you prefer keeping your current bulbs. For smart bulbs, use the app to connect them to your Wi-Fi. For switches, turn off the power at the breaker box before installation.
- Set Up Smart Thermostat
- Choose a thermostat compatible with your HVAC system. Follow the manufacturer's instructions to connect wires from your old thermostat to the new one, ensuring you note the wiring configuration to avoid issues.
- Install Smart Smoke Detectors
- Replace old smoke detectors with smart ones that send alerts to your phone. Follow the installation guide and ensure they’re interconnected. Test them monthly to ensure they function properly.
- Integrate Security Cameras
- Choose indoor or outdoor cameras based on your needs. Mount them securely and connect them to your network. Consider using a camera with a built-in spotlight for better night visibility.
- Set Up Voice Control
- Once everything is installed, program your hub to recognize voice commands. This can often be done through the accompanying app. Test the voice commands to ensure everything responds as expected.
Decision Points
Here are a few decision points I faced while setting up my smart home:
- Smart Hub vs. Individual Devices: I chose a smart hub for ease of control and better automation options. It saved time and reduced frustration in the long run.
- Smart Bulbs vs. Smart Switches: I opted for smart bulbs because they’re easier to install and more versatile. Smart switches require electrical knowledge and may need professional installation.
- Wi-Fi vs. Zigbee Devices: I went for Zigbee devices to avoid Wi-Fi congestion. They tend to be more reliable in larger setups since they create a mesh network.
- DIY Installation vs. Hiring a Pro: I did all the installations myself to save money, but if you’re uncomfortable with electrical work, hiring a pro ensures safety.
Troubleshooting & Fix-ups
Even the best-laid plans can go awry. Here are some issues you might face and how to fix them:
- Lights Flickering: This could indicate a compatibility issue. Check if your bulbs are compatible with your hub. If not, consider exchanging them.
- Smart Thermostat Not Connecting: Ensure your Wi-Fi signal is strong where the thermostat is installed. If it’s weak, relocate your router or use a Wi-Fi extender.
- Smoke Detectors Not Alerting: If they’re not sending alerts, check the battery status. Replace them if necessary, and ensure they’re connected to your app.
- Security Cameras Not Streaming: If you can’t access the camera feed, check your internet connection and ensure the camera is powered on and connected.
Common Mistakes & How to Avoid Them
Here are some pitfalls to watch out for:
- Rushing the Setup: Take your time during installation. Rushing can lead to mistakes that might cost you more time and money.
- Ignoring Firmware Updates: Always check for firmware updates for your devices. These updates often fix bugs and improve performance.
- Neglecting Security Settings: Set up strong passwords and enable two-factor authentication on your devices.
- Overlooking Compatibility Issues: Check compatibility between devices before purchasing. Make a list of all devices you plan to connect to avoid surprises.
Safety Tips
- Electrical Safety: Always turn off power at the breaker before starting any electrical work.
- Network Security: Protect your network credentials. Use strong passwords and follow device pairing security best practices.
- Monitor Device Performance: Regularly check that your devices function as intended. Investigate any inconsistent behavior immediately.
Budget & Time Ranges
The cost of setting up a smart home can vary widely:
- Basic Setup: Expect to spend between $200-$500 for a basic setup with smart lights, a thermostat, and smoke detectors.
- Upgraded Features: Adding security cameras or advanced hubs can push your budget to $1,000 or more.
- Time Investment: Plan for 2-5 hours for a basic installation, but allow extra time for troubleshooting and learning how to use your new devices.
- Factors Driving Cost: Brand, features, and installation complexity are the main factors affecting costs.
Stop & Call a Pro
If you notice any of the following symptoms, it may be time to call a professional:
- Inconsistent Wi-Fi Connection: If your smart devices frequently disconnect, you may need a network assessment.
- Frequent Electrical Issues: If you face tripped breakers or flickering lights, seek an electrician's help immediately.
- Unresponsive Devices: If devices fail to respond after troubleshooting, it might indicate deeper compatibility or hardware issues.
- Complex Wiring Needs: If you need to hardwire devices into your home’s system and are unsure, it’s safer to call a pro.
What I’d Do Differently If I Did This Again
- Skip Unnecessary Steps: I wouldn’t try to connect incompatible devices. Research beforehand.
- Plan Earlier for Power Needs: I’d assess power requirements more carefully before purchasing smart switches and plugs.
- Upgrade Tools: I’d invest in a better quality multimeter for checking voltage, saving time and stress during installation.
- Prepare for Surprises: I’d expect more connectivity issues than I initially anticipated and have a plan to troubleshoot them.
By following these steps and tips, you can create a safer, smarter home this winter. Don’t hesitate to reach out if you have questions along the way! Happy DIYing!
Recommended Gear
Disclosure: As an Amazon Associate, we may earn from qualifying purchases at no extra cost to you.
Common Mistakes
- Rushing the setup process leading to errors.
- Ignoring firmware updates for devices.
- Neglecting security settings like passwords and authentication.
- Overlooking device compatibility before purchase.
)